Showing posts with label 3d textures. Show all posts

Tuesday, January 28, 2014

Grow Your Own Tree in Photoshop CC

Photoshop CC continues to update and toss in features almost faster than I can discover them let alone learn what they do, so I usually just try to keep moving when something unexpected pops up on a menu.
But sometimes, straying off the path leads to great new discoveries.


So there I was going on my way trying to find out what was up with getting patterns to follow paths (which is great!), when I discovered that the bottom of the new "Scripted Path" menu had something called "Tree".

I think I expected some way of organizing paths in a hierarchy, maybe a mind map kind of thing, Windows style directory tree. You know, pretty much anything except a tree.

Nope.

Photoshop CC now has a pretty amazing tree generator. Like wow.
Here's how you do it:


I can't wait till there are more options to this. For instance, maybe it will allow you to generate and mess with 3D trees, maybe you can separate branches and leaves on their own layers, substitute your own textures for leaves and bark and so on. But this is a really cool new feature, perfect for quick background content for games, illustrations and 3D renders.


Friday, November 1, 2013

Materials - A Mini Lesson

First let me say, this truly is a mini lesson. Maybe lesson isn't the right word either. It was a heads up note card that I wrote and sent out as a notice to the Builders Brewery group in SL. Why would I do such a thing? Well partly because I really like materials and have spent quite a bit of time trying to figure them out over the last few months, but mostly because I also spend quite a lot of time in the BB group answering questions. In fact the original inspiration for this blog was to use it as a repository for oft answered questions about content creation in SL, and more detailed explanations than are possible in chat and classes.

So when Firestorm puts out a new beta viewer with materials and GASP a funny looking texture tab on the edit window, I just know there are going to be lots of questions. Questions in group, questions waiting as IMs, and note cards that begin with "maybe you'll know"....

Well maybe is right, I feel I should warn you that I don't know much about materials (yet), but since that has never stopped me before, here's my attempt to anticipate the first couple rounds of questions about the arrival of materials in your SL viewer.

Likely the first thing people will notice is that the texture tab looks different.
Don't panic, the same functionality is there, plus a few new capabilities.

There is now a tab called Materials, and the Texture tab can be used to apply 3 different kinds of texture information. The first one we are all already familiar with, though the name "diffuse" might sound a bit foreign, it's the basic final surface texture we have all been calling just texture.


The texture tab works the same as it always did. If you are just applying a regular texture, use this tab which will be on by default, then apply the texture the same way you usually do. Yes, local textures also work the same way.


Under the Texture (diffuse) tab you can now add 2 other kinds of texture information. The first is (in SL) called Bumpiness (normal). It can be used for a normal map if you have one. Normal Maps are commonly used to add more realism by making a surface appear raised or 'bumpy', or by preserving small sculpted details from higher resolution models. If you click the link, you will see there is a whole lot more to normal maps than Bumpiness


The other choice on the drop down tab is called Shininess (specular) and it is designed to read specularity maps, sometimes just called spec maps. A Specularity Map determines the shininess of a surface but also the quality of the shine. Polished wood surfaces have a softer edge to their highlights than hard plastic for instance. Metal is not only shiny and quite reflective, but the quality that we call metallic refers to the fact that metal often has different color(s) in its reflected highlights. 
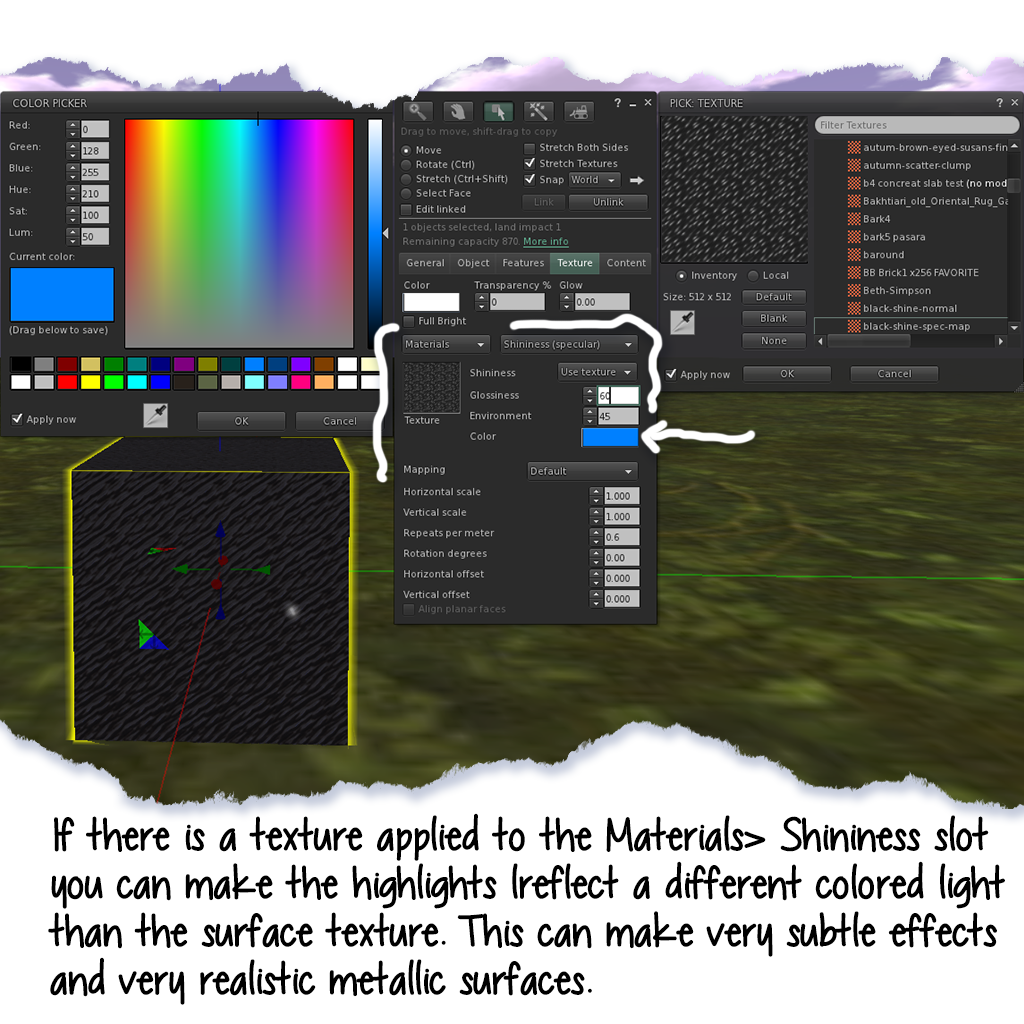

On the texture tab you can now assign as overall color to the reflected light or leave it white. You can also control how shiny the surface is (Glossiness), whether it reflects colors from the surrounding environment (Environment).
No, you can't make a mirror, but I did try. 


Materials can be really pretty in dimmer light conditions, and they look especially good as you move around or if lights are moving near them. 

I should apologise for having used a black texture for this demonstration lol. It was an accident born of the moment, an IM about fabrics and Photoshop pattern possibilities, and a freehand with gyazo.

If you would like to pick up the box with the sample textures inside, (since I hardly need say that the still photos above do NOT do materials justice), please visit the Builders Brewery Main building in SL, where these are available as a freebie. I will be adding to the selection regularly as I continue with my mad materials experiments.

Wish you knew more about materials? Me too! There's the knowledge base, and watch the Builder's Brewery Calendar for upcoming classes on both using and also making normal and spec maps.  


Now for those anticipated first few questions:


Q. Can everyone see materials?

A. No, most likely not. Right now you need to have a viewer that can read them (Exodus, Kokua, UKandDo, LL viewer , the new FS Beta, some versions of Cool VL).

Besides having a viewer that sees them, materials also require Advanced Lighting Mode in Preferences> Graphics.

By the way, it is NOT TRUE that you need to use Ultra or even a High graphics setting to enable Advanced Lighting Mode. It can be turned on, and works just fine on lower graphics settings. 

But materials do seem to require the settings shown below: Hardware skinning, Basic shaders, Atmospheric shaders, Advanced Lighting Model. If you are not sure whether your computer can handle these see my previous post


In particular, you might want to find out how your graphics card stacks up for life in SL. Not so long ago Oz Linden explained how the viewers decide what graphics settings each account starts out with based on a system to classify graphics cards. You can check how your card measures up on this table.

Not sure what graphics card you have? In SL go to the Help menu on the top bar of your viewer, and look inside About Second Life. That will give you a full account of your system and graphics card.


Q. Do I have to use materials now for texturing?

A. Of course not. You might never have any reason to use either a normal map or a specularity map.

Q. Do materials effect the Land Impact of objects?

A. Yup. Looks like every new feature from now on will be subject to a streaming cost calculation. That can mean materials will be bad news on tori and sculpties, but good news on plain box prims. In case you don't know what I mean, adding a material will have a similar effect to setting one prim to convex hull.

Q. What's the point of materials anyway?

A. Short answer is greater detail from fewer resources. 
Longer version is vertices - the points that determine surfaces in 3D space are complicated and expensive (resource -wise) to calculate, but texture information is relatively cheap. So 3D designers replace as much sculpted or modeled detail as they can with texture maps that the render engine (SL for us) will read. Meaning materials have the potential to give us more eye candy with less land impact and less lag than we would have without using them.

 To be continued....


Saturday, September 14, 2013

Texture Baking VS Texture Making Experiment

So this week I tried to talk 3 different people out of bothering to learn how to use nodes in Blender to bake in specularity and to try to make a spec map in graphics instead. 

There is no point, I said in faking what we can do for real, I said. Nodes are a bit advanced, I said. Even if you want to add a highlight effect, it will be easier to do it in a graphics program, I said. The less you give Blender to do with textures, the better I said. They didn't listen.

I'm not sure I blame them, because I wasn't all that sure I knew what I was talking about either. It was after all just a semi-educated guess. So I decided it was time for some science. 

First off I confess that lately I have been overstating not using Blender to create textures to make a point. The truth is Blender is not that bad and it lets you do texture stuff in really an amazing variety of ways. That said, it's also true that I have a pretty large bias towards Photoshop. I have it and I'm pretty comfortable in there. The same cannot necessarily be said for the 3 Blender users I was trying to persuade away from using Blender to create textures, or for many more Blender users that show up in classes. 

So this experiment uses a texture that was painted entirely in Blender texture paint using sampled photos. I did not even resize or adjust the photos before taking them into Blender. They came straight from CG Textures, to the tip of the texture draw brush in Blender.

After Painting the texture, I saved it as an image, and also baked an Ambient Occlusion map and saved that as well. 

For the fake bake spec version, I loaded up the texture, the ambient occlusion, and a normal map (for more smoothness on this low poly pot) into a material assigned to the pot. Then I set up some lights around the pot. I really did NOT spend enough time on the lighting, and I am sure my highlights suffered because of it. A bit more thought and time spent on lighting would doubtless have made this a closer contest. 

Next I needed a material node set up that would allow me to include specularity in the output - shown below:


To be fair to nodes (Compositing in Blender), they are not all that complicated, just something we're not used to (yet). I try to think of them as a diagram of the interactions and blends of pixels, kinda like layers and their operations and blends without the layering. 

So having saved the fake baked specularity texture as an image, I got busy doing things my usual way in Photoshop. As usual, I combined the ambient occlusion map with the texture I painted and saved from Blender, added a solid background layer and saved the image as a 512px png for upload. 

But since this is a contest of specularity effects created in Blender vs a spec map created in Photoshop using relatively familiar skills, I also needed to make a separate spec map. 

Now if there is some right or wrong way to do this, I would love to hear about it, or even an average over all grey scale value range would be helpful. For now, I just try to come up with maps that I think will work based on whatever texture I happen to be using, and then I experiment with the settings in on the edit window in SL. 

All I know for sure about this process is that the lighter the value is, the more specular the highlight can be in SL. So for this texture, since I wanted the rubbed metal bits, to be the ones that reflected light, and since they are a different color than the more oxidized bronze, I decided a Black & White Adjustment would be the way to go.


It wasn't dark enough over all.. specularity in SL is really shiny (or maybe that's me lol. again, I don't know what I am doing with this). So I added a levels adjustment to heighten the contrast and make the overall map quite a bit darker.


Then I saved the texture in the image above as a 512px png to use in world. Here's how they looked at the finish line:


I was surprised there wasn't more of a difference. In fact I was hoping that the difference would be so striking, and the pot with the spec map (on the left) to be so clearly superior, that not only would people stop bugging me to show them how to bake specular highlights into a texture in Blender, I would no longer need to bug them to go get a viewer with materials and start working on them. 
Maybe next week.

Tuesday, September 3, 2013

Zen & The Art Of Seams in Blender

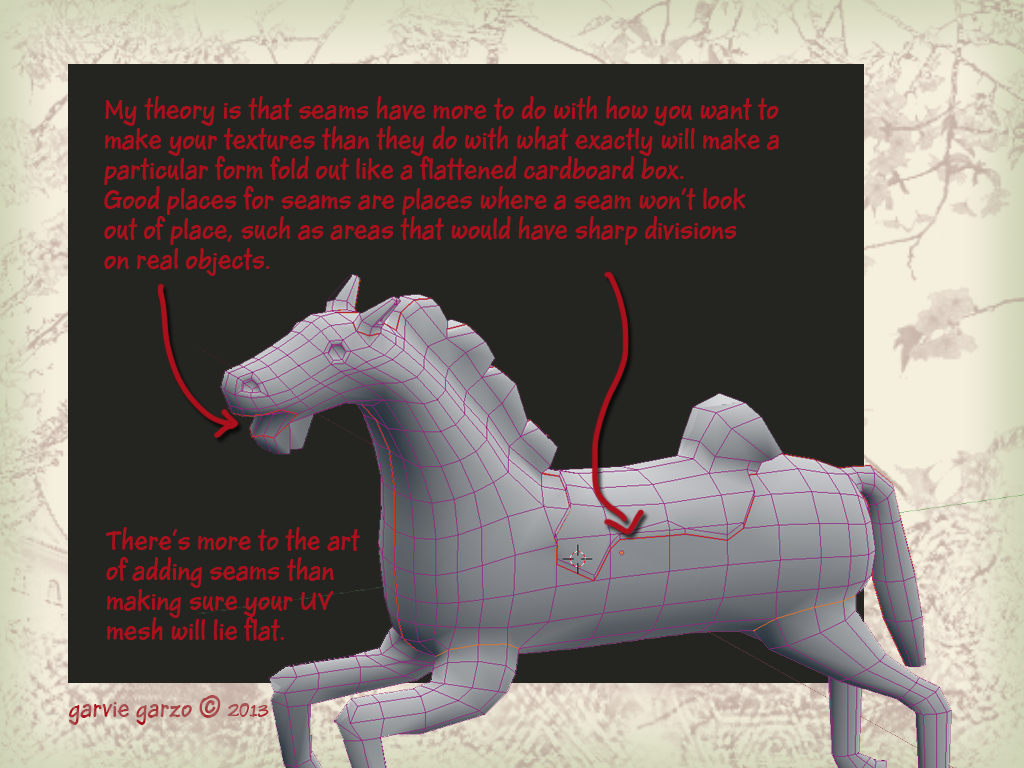
So this week I launched into Part 6 of the Box Modeling A Chair saga by introducing everyone to seaming a model in preparation for unwrapping. It was a crappy introduction. I should have said more to get the conversation started, explain that each side has a common goal or something. Anyway, here is a very brief guide to all the things I should have said just to get the party started. 

Texturing is important. And a UV map is a requirement, not an option. You don't absolutely have to make your own UV map from the ground up by manually adding all the seams. But the more control you take at the UV mapping stage, the more control you will have over your final texture. Besides that, the more you understand about the relation between your model, its seams and its texture, the more you will understand about making mesh objects. 

So let me briefly introduce you to seams in Blender, I think it might be the start of a beautiful friendship.


Wednesday, August 28, 2013

Drag & Drop in Blender

So yesterday, I ran across this great looking theme (he calls it a Format) for Blender on Sensei Blender on You Tube. One aspect in particular just struck me as so brilliant I simply could not believe I hadn't seen it done before - by anyone! I wish I had thought of it. Best I can do now is just share it.

You know that animation timeline window down at the bottom of your screen? Handy if animating or running simulations, but otherwise, kinda wasted real estate, so I usually keep mine squeezed shut. But a better idea (borrowed from the Sensei Format) is to turn that window into a File Browser. It's easy, it's fast, and it means you can DRAG & DROP textures and models into the 3D Viewport or UV Image Editor.

I already don't know how I lived without it.